Friday 18 December 2015

Iconic work analysis (Avatar)

A work that has visually inspired me is the movie avatar by James Cameron (2009). (Imdb, 2015) The movie illustrates an alien world Pandora where most of the planet's land is covered in jungle. What makes this jungle unique is that while the environment may imitate a jungle here on earth the movie also brings in elements of alien plants and animals of there own design. Fascinating thing about this movie is that it managed to avoid the uncanny valley even though the movie was rendered photoreal and tried to depict allot of fictional plants. To achieve the atmosphere of the film there was a lot of study that went into botany and animals to achieve both a good aesthetic and authentic design. While the environment may look appealing it also needs believability for immersion.
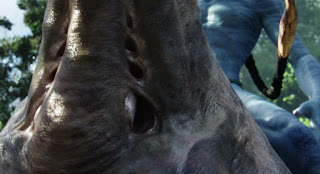
A good example is how the direhorse breaths. (Wikiacom, 2015) The movie revelas a shot of the direhorse breathing through its neck when Jake Sully is learning how to ride the horse.


A lot of the functionality was considered to evade the uncanny valley. When animating that shot they had to consider the muscle deformation of the neck to make it look like the holes swallowed and exhaled air. Instead of quadrupeds a lot of the ground animals contain 6 legs instead of 4 making these creatures more alien but they still had to consider muscle anatomy when animating They even had to construct their own muscles for the rig.


This movie was also a milestone in vfx technology. (Discovery, 2010) infact james cameron used this movie as a project to drive and advance the technology in computer graphics. In 1995 James earlier brought this to the vfx studios and the film was too demanding but in 2005 he saw how technology was developing to achieve specific goals in film such as Titanic and Terminator so he decided to use this project as a drive to further develop vfx.

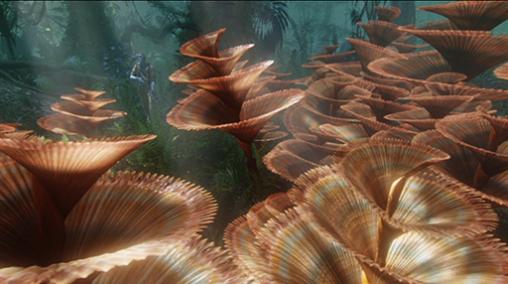
There is a special plant in the movie called the heicoradium spirale. (Pandorapedia, 2015) This plant will retract and coil up once touched. The reference explains that it is to avoid being eaten by herbivores but the movie doesn’t describe why it retracts. This shot only tells us there are foreign plants in that world. A botanist who did research for the film Jodie Holt (Holt, 2015) says that ‘there is a lot of real science that accompanies this movie.’ A lot of the research she provided was used by the artists.

The movie also referenced a Neolithic culture for the aliens both in design and character. Similar to the aboriginal and torres strait islander culture the designs of the aliens tools, weapons and clothing are an adaptation of their traditional assets.

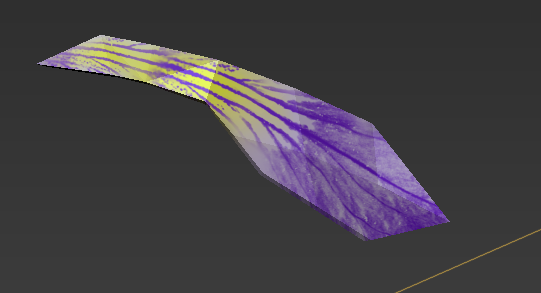
As a 3D artist myself I aim to go photoreal with the art pieces I create. whether it be fictional or nonfictional my goal is to make my art believable. Looking at this movie it takes a lot of study and research to develop a believable imagination and for me that is part of the joy of creating photoreal assets. Combining research from different areas to create something beautiful and believable.


Imdb. (2015). IMDb. Retrieved 18 December, 2015, from http://www.imdb.com/title/tt0499549/


Wikiacom. (2015). Avatar Wiki. Retrieved 18 December, 2015, from http://james-camerons-avatar.wikia.com/wiki/Operculum


Pandorapedia. (2015). Pandorapediacom. Retrieved 18 December, 2015, from https://www.pandorapedia.com/flora/herbaceous/helicoradium_spirale
Discovery. (2010). Youtube. Retrieved 20 December, 2015, from https://www.youtube.com/watch?v=Vt-XCDjyDNs


Holt, J.H. (2015). YouTube. Retrieved 19 December, 2015, from https://www.youtube.com/watch?v=J-l9fuumJ8w

Wednesday 16 December 2015

Reflective response

This trimester was very tough for me. Being exposed to a major group project, I learned the seriousness of putting in your weight and team effort. The project will only come together if everyone is putting in honest hours into the project.

At the beginning of the project in weeks three and four I started modelling the character and wasn't taking it very seriously. It was by the beginning of week five I submitted a sub standard mesh to the team that didn’t really follow the art style of the characters model sheets. What made it worse was that there were technical issues were it complained about faces with zero geometry area and turning on subD preview crashed maya. This made it difficult to skin the character and so the only thing the team was able to do was create the skeleton of the mesh without skinning it. My team then gave me another job and I thought that this would be the chance to redeem myself but sadly there were technical issues again and it was my fault. I created 12 blendshapes sculpting different facial poses in zbrush for the team to use. Having deleted 1 edge loop on 8 of the blendshapes screwed us over and so I learned that my actions and participation had a major impact on the team.

It's fair to say that by week 6 I lost allot of ‘cool points’ from the team.

Week 7 I had the KPI meeting and the producer gave me the task of remodeling the character and to submit it by next Wednesday(week 8). The mesh had to show a stronger relationship with the characters model sheets and had to contain better topology then the last mesh. It also needed more cloth tapering. To be safe I modeled without subD preview and only work with soft/hard edges. If the meshes requirements were not delivered by Wednesday week 8 then I was going to be fired by the executive producer.What I did to save myself was do some research on low poly characters specifically characters who had similar shirts and share with everyone on slack my plan of attack. I made sure I was having proper communication with the director while working on this to lock in any decisions on its aesthetic. (His micromanaging saved me and I thank him for that)

The mistake I made with my first character was that I did minimal research on low poly characters and there was a lack of testing. This is was also the first time I came across the issues of zera face area and subD preview crashing maya. I only thought of these issues as trivial and I didn’t consider how it would effect my teammates. Even when I completed the blendshapes I didn’t bother to test each one before handing them over.

Whenever modelling or doing any kind of 3D art I need to know what the assets I create are going to be used for. Not every 3D asset I create is going to be used as still life. There will be assets I create which will be animated and I need to make sure everything works for them, outliner is clean and there are no technical issues before handing over.Later down the track of the major project I slowly started gaining back my cool points as I was developing still assets in zbrush for my team to implement into their scenes. Not all the zbrush assets I made were used in the short film but I had a lot of fun learning zbrush and finding out good methodologies to be used later which is what happened. Having shown my team my research and development in zbrush they gave me the responsibility of sculpting a monster for one of the scenes. So I did a base low poly sculpt in zbrush and then imported the mesh to mudbox for texturing. It was actually the texturing in mudbox which made it more detailed because I painted bump map onto the sculpt. 

Throughout this project I did many different tasks and half the tasks I did were outside my speciality. I was texturing, Base matte painting (which I struggled in) and compositing. I was glad to be an extra pairs of hands for areas that weren’t my speciality. We didn’t have much time left so I did what I could to help.

As a 3D artist I am aiming for photoreal rendering in my future career so I’d be looking at Ray Tracing instead of NPR. But this trimester I had to work with a project that was not my style and we were using npr rendering and this is not the field I’m aiming for. Even though this project was not my style I still had a job to do and I made sure I did what I could to not only to redeem myself but to also have initiative helping produce something beautiful for the team. When working in studios I don’t doubt I will be asked to do tasks that are outside my of department or even my comfort zone.


Tuesday 8 December 2015

Nuke Compositing

I'm a newbie to nuke composoting. Allot of my knowledge about composoting mainly comes from after effects, Photoshop and adobe premier. I do have a little past experience on composoting in nuke but ever since Sunday (2 days ago) I started to take it seriously seeing as I was put on the job of composoting scene 2. I have some idea of what to do with the basics but I still had to research and experiment with the nodes to progress with composoting the scene. The thing that took up most of the time was having to learn how to navigate nuke and be able to work with what I've got.


Here I Animated the mattes with transform nodes. Separately animating the foreground and overall canvas. I never got to animating the background matte. The curve editor and motion path I used to my advantage to construct a neat animation. Using the playblast as a reference I am eyeballing and making the mattes move around similar to the playblasts.


There was an issue with roto so what I had to do was go in photoshop and cutout a specific part of the matte to mask out the character. Seeing as the research for roto was taking so long and I had a limited amount of time this was the best solution I could use.


Allot of the nodes I am figuring out and I am sure there are better ways of using these nodes but due to limited time I am just making sure it looks right in the viewer screen.

Monday 7 December 2015

Matte painting

Being an extra pair of hands on the matte painting stage. I did base mattes for scenes 3 and 4. Nothing too complex. Just using multiple photoshop filters(Mainly the cutout and pallet knife filter) and some digital painting to make the whole matte look cartoony. The refinements were given to the art director.


Out of all basic work I did in shots, this shot was my most favourite shot to paint.
For the textures I used the warp transform tool to give the textures some form and to mimick the direction of the topology in the scene.


Even though matte painting or texturing wasn't in my profesion I was glad to do them anyway. As a 3D artist my skills shouldn't just be aimed at 3D modelling, sculpting or unwrapping. I should be able to assist in areas of being a 3D artist so that would include. Knowledge on lighting and rendering, Able to do some digital painting and a good ability to navigate through Photoshop.

Wednesday 25 November 2015

Hammock Texturing

The texturing for the hammock was pretty straightforward. Allot of the texturing I find very straightforward. Using Mudbox to paint really does speed up my workflow and I don't have to always update textures in Maya. I can just see it there in mudbox then export texture map when done. I don't always send the final textured mesh back to maya. It does something funny with the sahder in Maya so I just export texture.


Painting this I first focused on the base colour and then used the burn tool on the inner areas to create shadow. I also painted on some very tiny tapers. Next I painted on some brighter and darker scratches for some more detailing and to break it up a bit.

Simple worm on a hook!

To be honest I don't think I needed to texture the worm. If I was thinking I could've just assigned 2 differnt materials onto the mesh instead of painting over it. The topology aloud me to do so aswell.


Flower Texturing

Iris

Texturing is like my secondary strength. Have unwrapped allot of these assets myself I was able to easily start texturing in mudbox. I chose Mudbox for texturing because the UVs were not symmetrical and I was able to see what the textures looked like in 3D.

Texturing the flower was very tedious but straight forward for me. With the UVs layed out I used 3 colours referncing the iris flower.

Here are a couple of different flower petals I textured

 I had to paint ever Petal individually. If I combined the mesh then the Uvs would have overlayed.
I simply used a bright violet for the base and a darker violet for the detailing. The yellow was another part of the flower.


Here are some Stencils I created to mimick the iris flower pattern on the flower petals. I ended up not usiing them because the texture became too photoreal and I ended up using brush strokes instead.


Reference:

Monday 23 November 2015

Learning the human head.

So I spent the 1st quarter of the day sculpting a human eye. Having the eyeball in place I was able to use it as a guide to sculpt around. To make him look older I added in a bit of flesh above the eye. I feel I should have done a proper eye though. :/ Next time I sculpt an eye I should aim to do it properly.


Future Reference


Sculpting a Skull

The rest of my day was spent by sculpting a human head. I only got the base mesh down seeing I'm following a digital tutors technique. I think I'll be sculpting the skull a second time though seeing I want to know the proper face scaffold. Reason I'm sculpting a skull is because I want to know how the human head functions and have an imaginary guide in my head whenever sculpting a head.


Still have a bit of a way to go. Tomorrow I plan on spending my morning sculpting another piece of the face. (Probably an ear or mouth) and then the rest of the day refining the skull. Once finished the skull I want to give it a second go.


References


Sunday 22 November 2015

Zremesher

Zremesher is a script in zbrush that will automatically retopologice your entire mesh. I don't trust this script because sometimes its edge flow can be very funny. You can control the script to some degree like guiding the edge flow and show its poly density. The test mesh I'm using is a model I made in Maya

Dynamesh version 

Zremesh with no guides. The scripts processing time ranges from 15 seconds to 1 minute. Processing time depends on the poly budget you give it.


Here I have drawn on zremeshguides for the script to use as a guide for edge flow. The blue and red highlights are painted on the mesh. These highlights indicate poly density.

Red = X2 polys
Blue = X0.25 Polys
White = X1 Polys


Overall for this test the edge flow didn't come out bad but there are some areas I see were it can be allot better. I feel it would be more safer to do retopo work more manually. But depending on what is required I guess I'd only use it 10% of the time.

Dynamesh!

Dynamesh!

I figured out a good workflow for creating organic 3D assets. When creating organic shapes assets (specially non-symmetrical ones) I've always struggled with the process of maininting good form with topology. I knew that the only way to have a good form was only by having good topology but now using the dynamesh function in zbrush frees me from having to always think about topology to nail good form. In zbrush I am able to first focus on the organic shapes form (silhouette) and then do retopo.

The dynamesh function makes the whole mesh uniform in poly density enabling me to sculpt in specific areas.

 Before Dynamesh
After Dynamesh
Notice how there are more polys for me to work with on the tail and its density is uniform with the rest of the mesh.

Its topology will be projected in an x and y axis from all sides of the mesh.

Edge flow aims to go for a straight X and Y

Projected from all sides.

Wednesday 18 November 2015

Monster Texturing

Its the 1st time I've ever been given the responsibility of texturing. I'm not so good for texturing in photoshop so I used mudbox instead. Using my bump map for a mask I was able to easily make the holes on his back a colour to the skin.

I mixed around a broad range of colours for this. Drak green and pruple were used very subtly. Red and dark red browns were used for blood areas and sores and the primary was a skin colour. I burned and dodged areas of the skin to make sure the base skin colour wasn't so based and made sure there were some darker and brighter areas of the skin.


I worked allot on the back and didn't put much effort into the face. It was only till last night I found out the back was going to have 4 seconds of screen time. There is also going to be quite a bit of screen time for the face and I don't know if there is enough detail on there. I may be adding too much detail if I continue.

Monster Vlog

Vlog about my monster


Monday 16 November 2015

Monster Sculpting!

So here I've sculpted a creature who was once human but got infected by the cave and became a horrible plant humanoid. Exciting part about this task was that I got to use a broad range of software to achieve the desired look.


I first used zbrush to achieve the monsters basic form using the dynamesh fincution to my advantage and not worrying about the topology. While doing the sculpting in zbrush I was making sure the sculpt was not so intricate.

1st pass Detailing


Retopo

Here I used a script to do most of the reopology work. But for meshes like these its best not to use the script cause even though it may maintain quads


here you can draw paths that'll guide the edge flow but its still not a hundred percent reliable. sometimes an edge loop would wrap around the neck 2 or 3 times or the edge loop would go in very random directions. I would've been safer to retopo manually instead of using the zremesher script. But seeing as there is only going to be a cluster for the neck to rotate its safe to say it should be fine. Though this script may save allot of time I don't plan on using it much. This kind of script still needs allot of work.

Here is a single edge loop selected around the neck. It wraps around the meshes neck 3 times like a coil :( There are other areas were the edge flow is completely of but its good enough for clusters.
UV shells were fine and so was the texel density.


2nd pass detailing(Bump map texturing)

For more detailing I decided to paint on a bump map. Reason being was to make sure that the animators weren't working with an extremely high poly mesh. This was also to save render time and make sure it was easy to import and navigate. Seeing as the back was going to be shown more I detailed the back area more than the front area. Not much of the front was going to be rendered.


Thursday 12 November 2015

Reducing poly count of high poly assets.

I didn't retopo allot of the assets but instead I remeshed them to a lower poly. This saved allot of time because there were allot of assets to go through. The matte painters won't be texturing this. They simply want to use this as lighting reference and render it in grey scale. Reason I had to reduce the poly count was to make the pipeline easier. Making sure that the animators are able to navigate through the vieport easily.

allot of these assets were converted from 100k or higher down to 10k or lower.